[Android] kizitonwose/Calendar 캘린더 라이브러리 사용기 #1
GitHub - kizitonwose/Calendar: A highly customizable calendar view and compose library for Android and Kotlin Multiplatform.A highly customizable calendar view and compose library for Android and Kotlin Multiplatform. - kizitonwose/Calendargithub.com캘린
ogyong.tistory.com
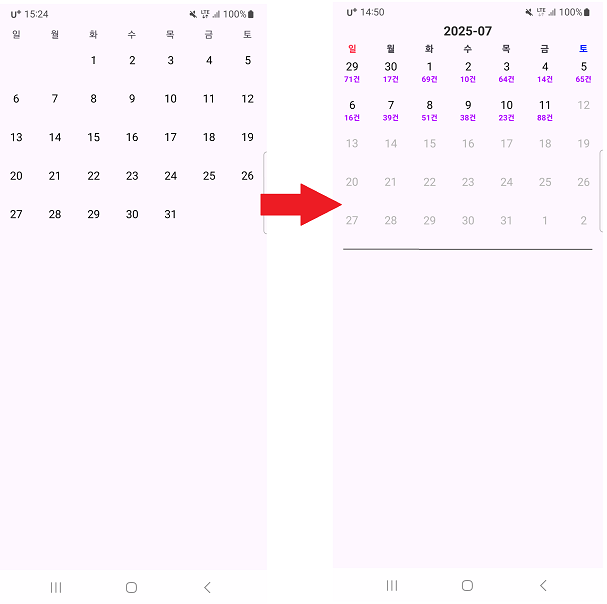
지난번 kizitonwose/Calendar, 캘린더 라이브러리 사용기 #1에 이어서 몇 가지 기능을 추가해 보려고 한다.
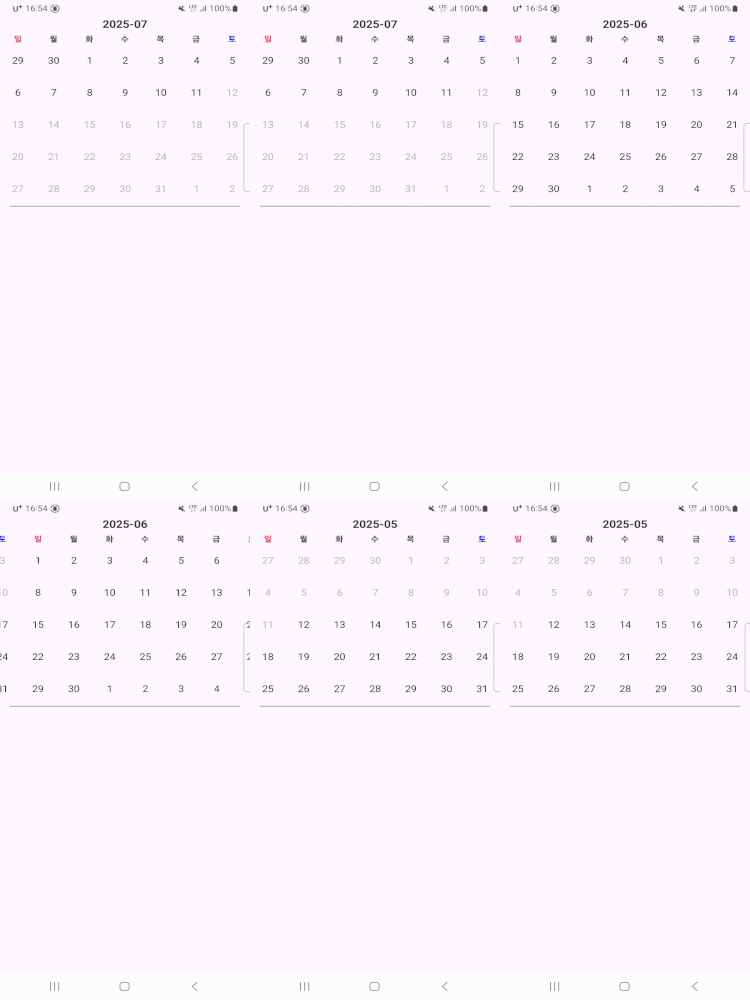
- CalendarView 가 나타내고 있는 연, 월 표시
- 요일을 표시할 때 일요일과 토요일에 다른 컬러 주기
- 날짜 제한
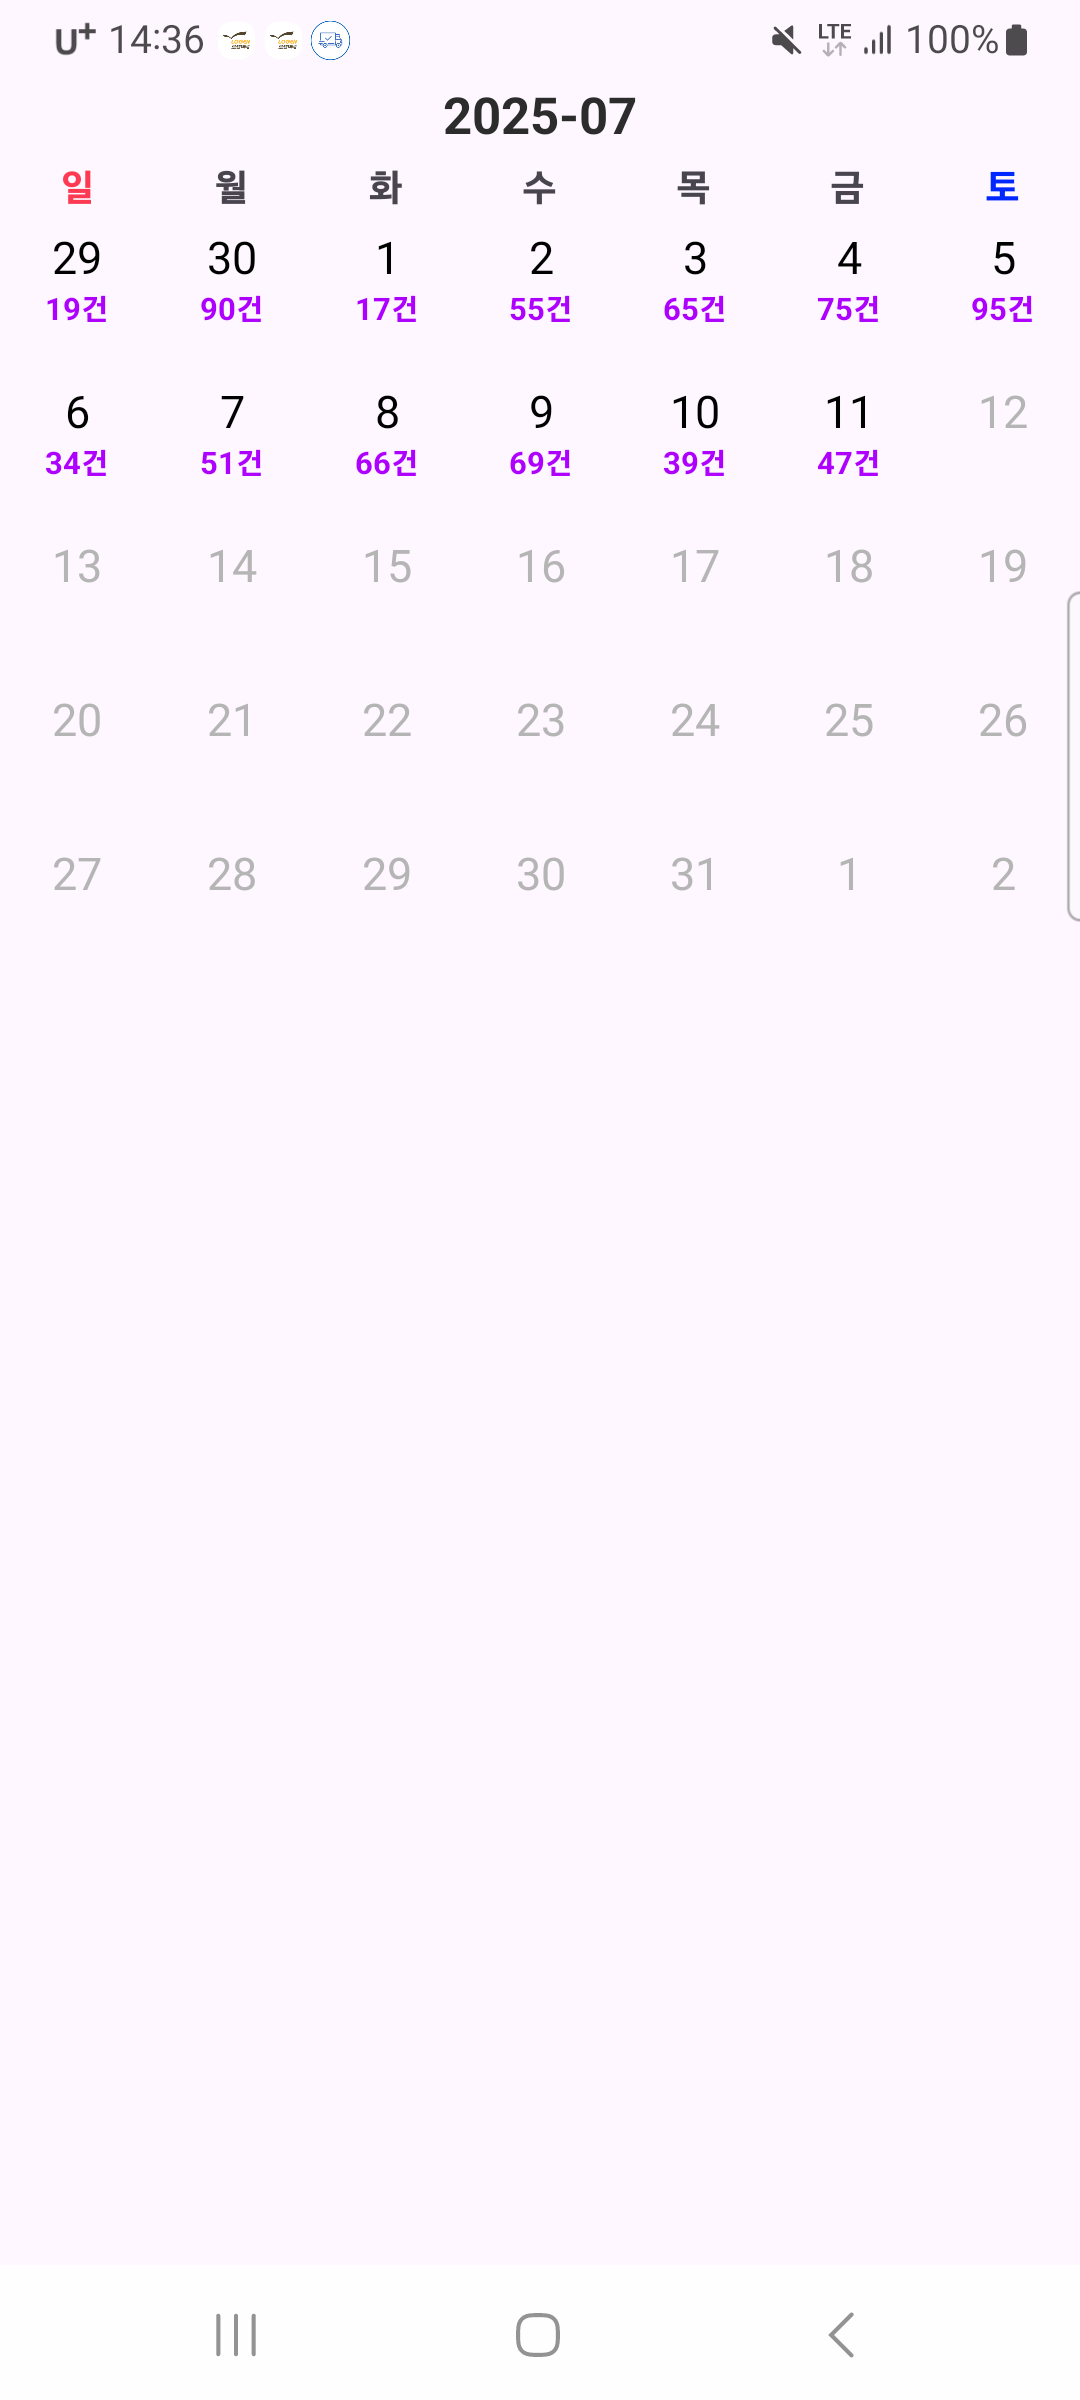
- 날짜 View 이외에 작업량과 같은 데이터 표시
우선 결과 화면은 아래와 같다.

◾ CalendarView 가 나타내고 있는 연, 월 표시
activity_main.xml
<androidx.constraintlayout.widget.ConstraintLayout
    android:id="@+id/main"
    android:layout_width="match_parent"
    android:layout_height="match_parent"
    tools:context=".MainActivity">

    <TextView
        android:id="@+id/tv_title_date"
        android:layout_width="wrap_content"
        android:layout_height="wrap_content"
        android:gravity="center"
        android:textColor="@color/colorDarkGray"
        android:textStyle="bold"
        android:textSize="18sp"
        app:layout_constraintTop_toTopOf="parent"
        app:layout_constraintStart_toStartOf="parent"
        app:layout_constraintEnd_toEndOf="parent"
        tools:text="2025년 07월" />

    <com.kizitonwose.calendar.view.CalendarView
        android:id="@+id/calendarView"
        android:layout_width="match_parent"
        android:layout_height="wrap_content"
        android:layout_marginTop="4dp"
        app:layout_constraintTop_toBottomOf="@id/tv_title_date"
        app:cv_dayViewResource="@layout/calendar_day_layout"
        app:cv_monthHeaderResource="@layout/calendar_day_titles_container" />

    <View
        android:layout_width="match_parent"
        android:layout_height="1dp"
        android:background="@color/colorDarkGray"
        android:layout_marginTop="2dp"
        android:layout_marginHorizontal="15dp"
        app:layout_constraintTop_toBottomOf="@id/calendarView"/>
</androidx.constraintlayout.widget.ConstraintLayout>
우선 activity_main에서 연도와 월을 표시할 TextView와 CalendarView를 구분해 줄 View를 하나 넣었다. CalendarView가 스크롤이 되면 바뀐 연도와 월에 맞춰 변경을 해줘야 한다.
MainActivity.kt
private fun setListener() {
    binding.calendarView.monthScrollListener = { month ->
        binding.tvTitleDate.text = month.yearMonth.toString()
    }

    // 생략
}
kizitonwoze 라이브러리에는 monthScrollListener가 있다. monthScrollListener는 캘린더가 새 달로 스크롤이 될 때 호출이 된다. 위의 리스너만 등록해 주면 CalendarView가 나타내고 있는 연도와 월을 표시할 수 있게 된다.

◾ 요일을 표시할 때 일요일과 토요일에 다른 컬러 주기
MainActivity.kt
private fun setListener() {
    binding.calendarView.monthHeaderBinder = object : MonthHeaderFooterBinder<MonthViewContainer> {
        val daysOfWeek = daysOfWeek()

        override fun create(view: View) = MonthViewContainer(view)
        override fun bind(container: MonthViewContainer, data: CalendarMonth) {
            if (container.titlesContainer.tag == null) {
                container.titlesContainer.tag = data.yearMonth
                container.titlesContainer.children.map { it as TextView }
                    .forEachIndexed { index, textView ->
                        val dayOfWeek = daysOfWeek[index]
                        val title = dayOfWeek.getDisplayName(TextStyle.SHORT, Locale.getDefault())
                        if (title == "일") {
                            textView.setTextColor(getColor(R.color.colorRed))
                        } else if (title == "토") {
                            textView.setTextColor(getColor(R.color.colorBlue))
                        }

                        textView.text = title
                    }
            }
        }
    }

    // 생략
}
MonthHeaderFooterBinder에서 요일에 대한 처리를 하는데, 이곳에서 일요일과 토요일에 대한 textColor를 설정했다.

◾ 날짜 제한
DayViewContainer.kt
class DayViewContainer(view: View): ViewContainer(view) {
    val binding = CalendarDayLayoutBinding.bind(view)
    val containerView = binding.clContainer
    val dayView = binding.calendarDayText
}
DayViewContainer에 DataBinding을 적용해주고, 변수명도 수정했다.
MainActivity.kt
private lateinit var today: LocalDate

override fun onCreate(savedInstanceState: Bundle?) {
    today = LocalDate.now()
    // 생략
}

private fun setListener() {
    binding.calendarView.dayBinder = object : MonthDayBinder<DayViewContainer> {
        override fun create(view: View) = DayViewContainer(view)
        override fun bind(container: DayViewContainer, data: CalendarDay) {
            val containerView = container.containerView
            val dayView = container.dayView
            dayView.text = data.date.dayOfMonth.toString()

            // 60일 전과 오늘 이후 날짜 사용 금지
            val agoDate = today.minusDays(60)
            val useDate = !data.date.isBefore(agoDate) && !data.date.isAfter(today)

            if(useDate) {
                containerView.visibility = View.VISIBLE

                if (data.date == selectedDate) {
                    dayView.setTextColor(Color.WHITE)
                    containerView.setBackgroundResource(R.drawable.selection_background)
                } else {
                    dayView.setTextColor(Color.BLACK)
                    containerView.background = null
                }

                containerView.setOnClickListener {
                    val currentSelection = selectedDate
                    if (currentSelection == data.date) {
                        selectedDate = null
                        binding.calendarView.notifyDateChanged(currentSelection)
                    } else {
                        selectedDate = data.date
                        binding.calendarView.notifyDateChanged(data.date)
                        if (currentSelection != null) {
                            binding.calendarView.notifyDateChanged(currentSelection)
                        }
                    }
                }
            } else {
                dayView.setTextColor(getColor(R.color.colorGray))
            }
        }
    }

    // 생략
}
CalendarView의 날짜와 관련된 부분은 MonthDayBinder에서 처리를 하게 된다. bind 블록에서 60일 전과 오늘 이후의 날짜에 대해 사용할 수 없도록 처리를 했다. 임시로 60일을 기준으로 잡았다.
위의 작업은 날짜 View에 대한 처리만 되어 CalendarView가 제한 범위 밖으로 스크롤이 된다. CalendarView의 월 표시 제한은 CalendarView를 처음 설정할 때 사용했던 minusMonths와 plusMonths에서 해야 한다.
MainActivity.kt
private fun setCalendar() {
    val currentMonth = YearMonth.now()
    val startMonth = currentMonth.minusMonths(2)
    val endMonth = currentMonth.plusMonths(0)
    val daysOfWeek = daysOfWeek()
    binding.calendarView.setup(startMonth, endMonth, daysOfWeek.first())
    binding.calendarView.scrollToMonth(currentMonth)
}
minusMonths를 통해 두 달만 이동할 수 있게 하고, plusMonths를 통해 오늘 이후의 월은 이동할 수 없게 했다.

◾ 날짜 View 이외에 작업량과 같은 데이터 표시
data class SampleData(
    val total: Int,
    val date: String
)
위와 같이 수량(total)과 날짜(date)를 갖는 데이터가 있을 때 날짜마다 total 값을 함께 표시하려고 한다.
calendar_day_layout.xml
<androidx.constraintlayout.widget.ConstraintLayout
    android:id="@+id/cl_container"
    android:layout_width="match_parent"
    android:layout_height="wrap_content"
    android:descendantFocusability="blocksDescendants"
    android:paddingVertical="5dp">

    <TextView
        android:id="@+id/calendarDayText"
        android:layout_width="match_parent"
        android:layout_height="wrap_content"
        android:gravity="center"
        android:textSize="16sp"
        app:layout_constraintTop_toTopOf="parent"
        tools:text="22" />

    <TextView
        android:id="@+id/tv_count"
        android:layout_width="match_parent"
        android:layout_height="wrap_content"
        android:textSize="11sp"
        android:textStyle="bold"
        android:textColor="@color/colorPurple"
        android:gravity="center"
        app:layout_constraintTop_toBottomOf="@id/calendarDayText"
        tools:text="5건" />
</androidx.constraintlayout.widget.ConstraintLayout>
DayViewContainer.kt
class DayViewContainer(view: View): ViewContainer(view) {
    val binding = CalendarDayLayoutBinding.bind(view)
    val containerView = binding.clContainer
    val dayView = binding.calendarDayText
    val countView = binding.tvCount
}
날짜 이외에 수량 값을 표시하기 위해 calendar_day_layout에서 수량을 표시할 TextView를 추가한다. 그리고 DayViewContainer에도 countView를 추가한다.
MainActivity.kt
private fun setListener() {
    binding.calendarView.dayBinder = object : MonthDayBinder<DayViewContainer> {
        override fun create(view: View) = DayViewContainer(view)
        override fun bind(container: DayViewContainer, data: CalendarDay) {
            val containerView = container.containerView
            val dayView = container.dayView
            val countView = container.countView

            // 60일 전과 오늘 이후 날짜 사용 금지
            val agoDate = today.minusDays(60)
            val useDate = !data.date.isBefore(agoDate) && !data.date.isAfter(today)

            dayView.text = data.date.dayOfMonth.toString()

            if(useDate) {
                containerView.visibility = View.VISIBLE

                val count = sampleList.find { it.date == data.date.toString() }?.total?:0
                countView.text = "${count}건"

                if (data.date == selectedDate) {
                    dayView.setTextColor(getColor(R.color.white))
                    countView.setTextColor(getColor(R.color.white))
                    containerView.setBackgroundResource(R.drawable.selection_background)
                } else {
                    dayView.setTextColor(getColor(R.color.black))
                    countView.setTextColor(getColor(R.color.colorPurple))
                    containerView.background = null
                }

                containerView.setOnClickListener {
                    val currentSelection = selectedDate
                    if (currentSelection == data.date) {
                        selectedDate = null
                        binding.calendarView.notifyDateChanged(currentSelection)
                    } else {
                        selectedDate = data.date
                        binding.calendarView.notifyDateChanged(data.date)
                        if (currentSelection != null) {
                            binding.calendarView.notifyDateChanged(currentSelection)
                        }
                    }
                }
            } else {
                dayView.setTextColor(getColor(R.color.colorGray))
                countView.setTextColor(getColor(R.color.colorGray))
            }
        }
    }

    // 생략
}
MonthDayBinder에서 DayViewContainer에 선언한 countView의 텍스트를 설정해 준다. useData 블록 내에서 sampleList의 날짜와 CalendarView의 날짜와 일치하는 값을 찾아서 적용하면 된다. 추가로 클릭했을 때와 제한 범위를 고려하여 텍스트 색상 등을 적용했다.

Android_Study/Calendar by Kizitonwose at calendar-by-kizitonwose-step2 · OhGyong/Android_Study
안드로이드 개발 공부. Contribute to OhGyong/Android_Study development by creating an account on GitHub.
github.com
'Android > UI' 카테고리의 다른 글
| [Android] Clip 속성 알아보기: ClipChildren, ClipToOutline, ClipToPadding (0) | 2026.02.11 |
|---|---|
| [Android][Compose] kizitonwose/Calendar, 캘린더 라이브러리 사용기 #3 (3) | 2025.07.14 |
| [Android] kizitonwose/Calendar, 캘린더 라이브러리 사용기 #1 (1) | 2025.07.08 |
| [Android][Compose] Material2→Material3의 Typography (0) | 2023.05.26 |
| [Android] SplashScreen 사용하기 (0) | 2023.04.16 |
